


a few of the buttons I've made
Note: If you have trouble with the tutorial, feel free to contact me for help: darlene@darleneschacht(dot)net
I've created a little tutorial that will help you create a button and code it for Blogger. Unfortunately I have tried this code on Wordpress, and we've had a bit of difficulty with it.
*Update*: Amy Bayliss provided us with a code for Wordpress blogs, which you will find near the end of the tutorial. Thank you Amy!
<div align="center"> <a href="Blog URL" ><img border="0" src="Image URL" /></a> </div> <div align="center"> <form><textarea rows="6" cols="20"><a href="Blog URL" ><img border="0" src="Image URL" /></a></textarea></form> </div>

<textarea rows="4" cols="25" style="font-size: 0.5em;" readonly="readonly" onclick="this.select();"><center><a href="BLOG URL HERE">
<img src="IMAGE URL HERE"/></a></textarea></p><br/>
<text style="font-size: 0.7em;">ON A PC: Use Ctrl + C to copy and Ctrl + V to paste. ON A MAC: Use Command + C to copy and Command + V to paste.</text></center>
Add This Code to Blogger:
You are loved by an almighty God,
Darlene
For comments or questions, contact me at:
darlene[at]darleneschacht.net
Find Time-Warp Wife on facebook: Click here
If you would like to have Time-Warp Wife delivered to your inbox daily, simply click here: Subscribe to Time-Warp Wife
I'm using Photoshop 7 to create the graphic. I can't walk you through all of the various photo programs that you might have, but I can say that many of them work in a similar way. If you don't have Photoshop, I'd suggest using Pxlr Editor, which is a free online program, and very similar to Photoshop.
Each step is listed under the graphic. I know that this looks incredibly intimidating, but really it's very easy--very basic. There's just a lot of baby steps for beginners.
If you already know hot to create the graphic, then you can skip down the page and go straight to coding the image.
Creating the Image
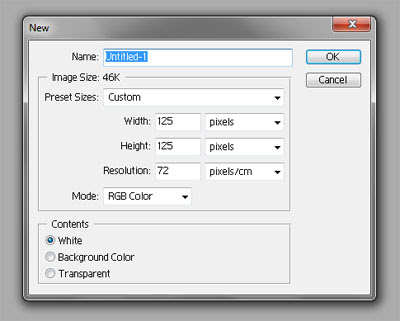

Step 2: Open Photoshop and click File/New. This box you see will pop up.
You want to create all web graphics at a resolution of 72 dpi and set the mode to RGB.
I can title it, but I never bother until I save it, so I left it "untitled."
The canvas size that I am using is a standard button size of 125 x 125 pixels.
You want to create all web graphics at a resolution of 72 dpi and set the mode to RGB.
I can title it, but I never bother until I save it, so I left it "untitled."
The canvas size that I am using is a standard button size of 125 x 125 pixels.

Step 2: Open a graphic that you like such as your blogger header by going to File/Open and finding it on your computer. Hopefully you have images on your computer that you can use.
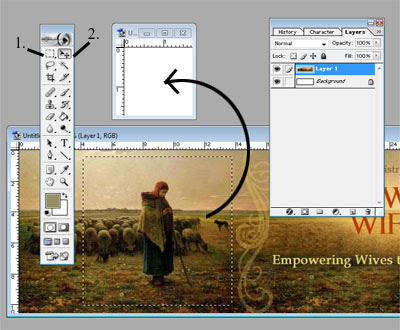
Decide what portion of the image you want in your button. Next go to the "dancing ants" tool that I labelled #1. Click that tool.
Left Click while you drag your mouse (on lap top I left click and slide my finger) to define the dancing ant area. Don't let go of Left Click until the area you want is defined.
If you want to remove the dancing ant square at anytime, you can press Cntrl/d (for deselect) simultaneously. For now, let them dance.
See how I've defined the area that I want with the dancing ants? That's the image I want for my button.
Now I'm going to select the pointer tool #2 (in the toolbox), then place my cursor inside the area of the dancing ants. Left Click while I'm dragging my mouse from one image to the 125 x 125 px canvas.
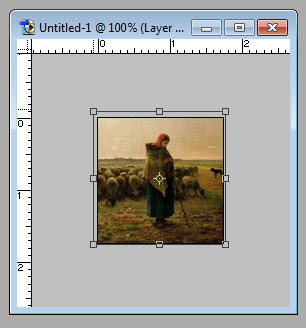
Now we have the section of my image sitting on our button canvas. I can move that image at anytime by using the pointer tool (#2). (Providing that dancing ants are off--they can be annoying sometimes!)

Step 3: Now let's work with the button.
Chances are that the image you placed in this small area is way too big.
That's not a problem. We can resize it by clicking Edit/Transform/Scale from the top menu.
Once you do that, you will see handle bars on your image as shown above. Shift/Left Click one of the handle bars on the corner, and drag to resize.
The reason that we are Shift/Left Clicking simultaneously here is so that the image will retain it's proportion. If you merely Left Clicked and dragged, you could distort the image.
If you make a mistake at any time you can go back a step in your history palette. Look for the history palette behind "layers" in the following image.
Step 4: Before we move on, you'll need to choose a color for your text box. If you look at the image in step six, you will see that I have two colors there: foreground (white) and background (red). See it in the toolbox on the left? It's right down at the bottom. They can be switched at anytime by clicking the little arrow beside them, putting red on top and white on the bottom.
Step 4: Before we move on, you'll need to choose a color for your text box. If you look at the image in step six, you will see that I have two colors there: foreground (white) and background (red). See it in the toolbox on the left? It's right down at the bottom. They can be switched at anytime by clicking the little arrow beside them, putting red on top and white on the bottom.
To change these colors, just give one of them a click using the pointer tool (#2) and choose from an array of colors that pops up.
Step 5: Working with layers.
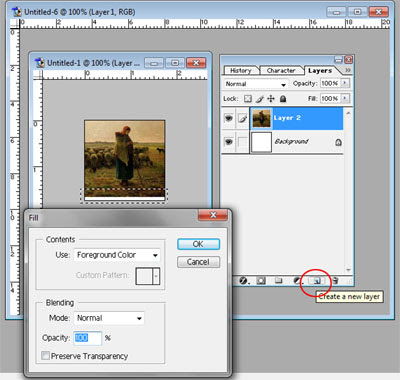
See the layers palette on the right? If you don't see yours, go to Window/Layers to make sure it's checked. Unchecked items don't show up.
We're going to create a new layer by going to the bottom of that layers palette where you see several small icons. Click the one that looks like a paper. It's right next to the trash can.
Anything that you do on this layer will not affect the layers below it. It's like pasting a sticker on top of your art work. So you can work on creating this layer and then merg them later.
Once you click the new layer icon, you will see layer 3 in the palette, which is the layer that you are on. Go to the toolbox and grab tool #1 again to create more dancing ants.
Now you are going to create a rectangle box at the bottom of the button. See where I have put mine? You do this by left clicking and dragging the mouse. It defines the area where the dancing ants will go.
With the ants still active, click Edit/Fill from your top menu. A dialogue box pops up like the one shown above. You'll see that it says "Foreground Color." My red was in the background, so I switched that part and hit okay. I left everything else as it was there. Now deseclect dancing ants: Cntrl/d. Always remember to deselect the ants as it can cause some interferance.

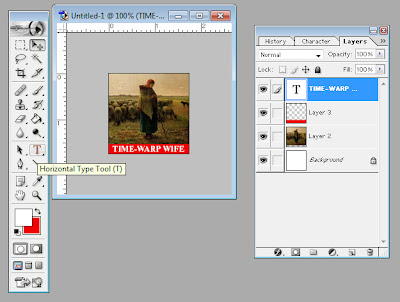
Step 6: Let's create another layer by clicking that icon in the layers palette. Then use your "Horizontal Type Tool" that you can see in the toolbox on the left. I click the type tool, and wherever I click on my image is where it will place the type (I can move it later). Then I type "Time-Warp Wife."
If you want to choose a font, or size your font, you can highlight your text, like you would in a program like Word, and make changes to it through the "Character" palette. I have my character palette right next to my layers palette. They are all together on the right. (Yours might be in separate palettes.)
Chances are you will want to move your text after you type and edit it. You can move it or nudge it by using your pointer tool, #2.

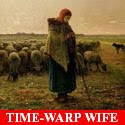
You will now have a button like this. Go to File/Save As
Select "as a copy" and from the drop down menu click jpg.
Title your image, and then hit "Save."
Coding the Image
If you have a photobucket account or something similar, then upload your image and copy the address of the image you get from there. The address will start with html and end with jpg.
I would advise that you check to ensure you have the correct address of the image. You can do this by pasting it into your internet browser just like you would any web address. If it's correct, it will bring you to the image. If you don't see the image, then you need to recheck to ensure that you have the correct URL for it. On my computer I right click any image and choose copy image URL.
If you don't have an account like Photobucket, then simply open a new post in blogger, upload the button image, and save the post in "draft" mode. You can see the URL in html mode, or you can view the page in "preview" mode to find out the address of the button. Right click the button and you should see "copy image URL" or "inspect element." Regardless of where you send this button to on the net, you need that URL to code it.
Now that you have the URL of the image, you also need to choose an URL to where it would be directed. For example, mine is http://www.timewarpwife.com. Copy and paste these two URLs someplace because you will need them in a minute.
I used a standard code for all of my buttons. I'll give you that code, and all you have to do is swap your URLs in for the one's below. Note: When you put your URLs in place, ensure that they start with http:// don't start the URL with www. or it won't work. It needs the entire web address in both places. Actually there are four places as each one is entered twice. See below:
<div align="center"> <a href="Blog URL" ><img border="0" src="Image URL" /></a> </div> <div align="center"> <form><textarea rows="6" cols="20"><a href="Blog URL" ><img border="0" src="Image URL" /></a></textarea></form> </div>
Finally, here's what you'll get!
Readers can copy the code within the html box and paste it on their site. Go ahead, try it. LOL!
*Update*: Amy Bayliss provided us with a code for Wordpress blogs. Thank you Amy!! This is Amy's code below:
<center><a href="BLOG URL HERE"><img src="IMAGE URL HERE"/></a></center><p align="center">
<textarea rows="4" cols="25" style="font-size: 0.5em;" readonly="readonly" onclick="this.select();"><center><a href="BLOG URL HERE">
<img src="IMAGE URL HERE"/></a></textarea></p><br/>
<text style="font-size: 0.7em;">ON A PC: Use Ctrl + C to copy and Ctrl + V to paste. ON A MAC: Use Command + C to copy and Command + V to paste.</text></center>
Add This Code to Blogger:
Log in to blogger. Go to "design" mode. One your sidebar click, "add a gadget." Choose html/java script and paste the code into the large text area of the pop up window. Save your changes.
To add it within the body of a post such as a button for a weekly meme, you need to be in html mode and you can simply paste it in.
Darlene
For comments or questions, contact me at:
darlene[at]darleneschacht.net
Find Time-Warp Wife on facebook: Click here
If you would like to have Time-Warp Wife delivered to your inbox daily, simply click here: Subscribe to Time-Warp Wife


